Sadržaj
Kako da podesite SMTP email na wordpressu. Stvar je prilično jednostavna pogotovo ako korsitite plugin. U ovom tekstu pokazaćemo oba načina i preko plugina i preko obične PHP funkcije pa šta je vama lakše.
Šta je potrebno
Da bi ste omogućili da vaš sajt sašelje emailove recimo sa kontakt forme ili bilo koji drugi neophodno je da podesite SMTP na svom sajtu.
Da bi SMTP bio podešen potrebno je prvo da imate kreiranu email adresu.
Kreiranje biznis email adrese
Drugi korak kada sada imate email adresu jeste instalacija WP Mail SMTP i podešavanje tog plugina.
Instliranje plugina WP mail SMTP
Prvo uđemo u naš dashboard našeg wordpress sajta. Ukoliko ne znate kako evo video uputstvo.
Sada kada idemo tu idemo na plugin (Dodaci ako je na srpskom) pa idemo dodamo novi i tražimo naš plugin.
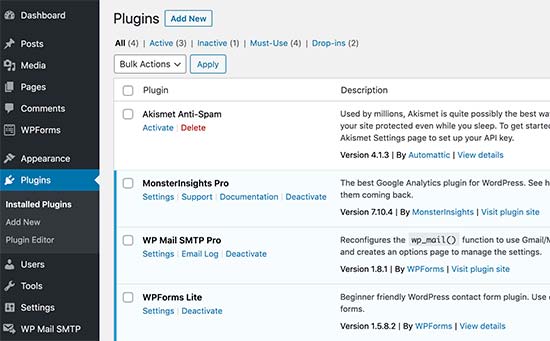
Kada smo tu došli u polje za pretragu ukucamo „wp mail smtp“, instliramo i aktiviramo
Podešavanje WP Mail SMTP
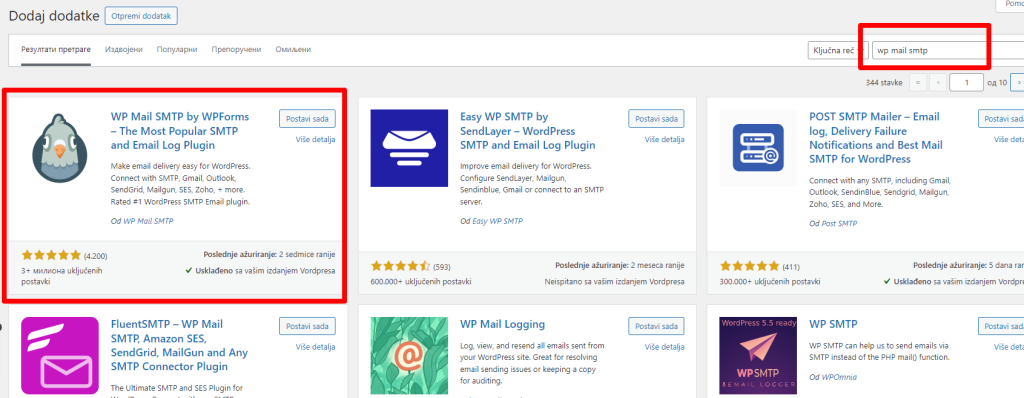
Prilikom instalacije nas vodi na neki setup to ignorišemo i vratimo se nazad.
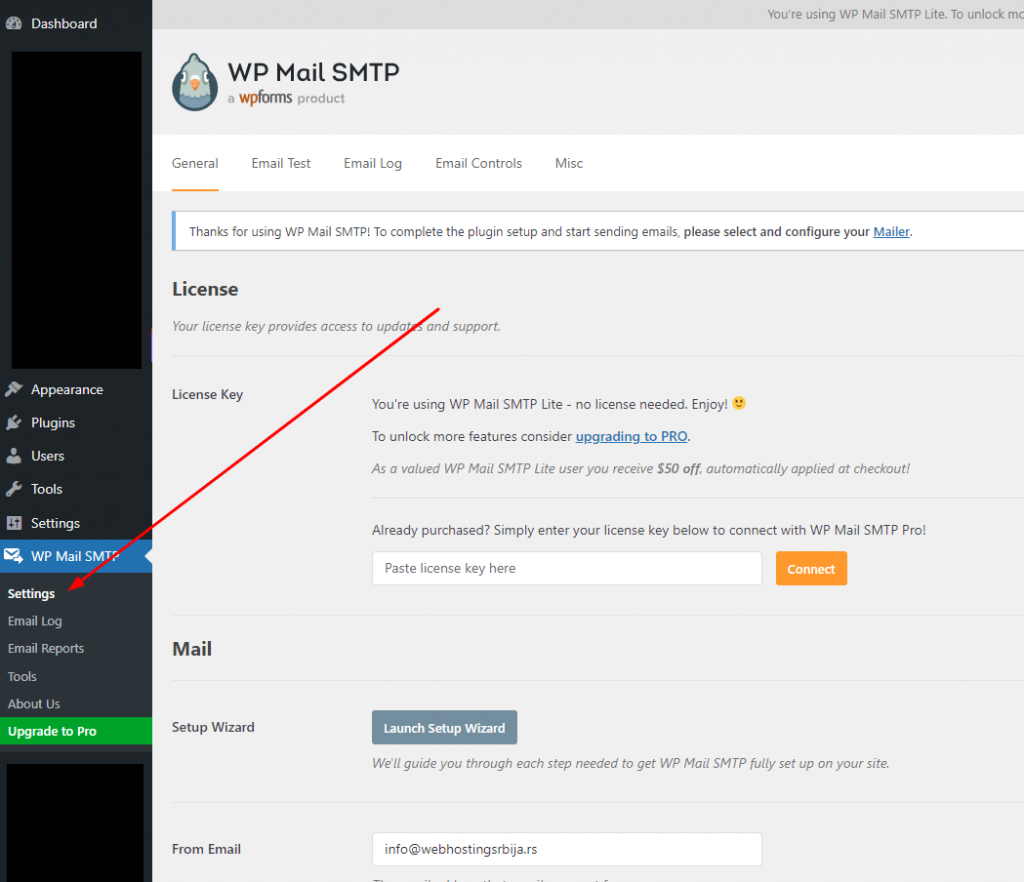
Idemo na Settings kao na slici ispod.
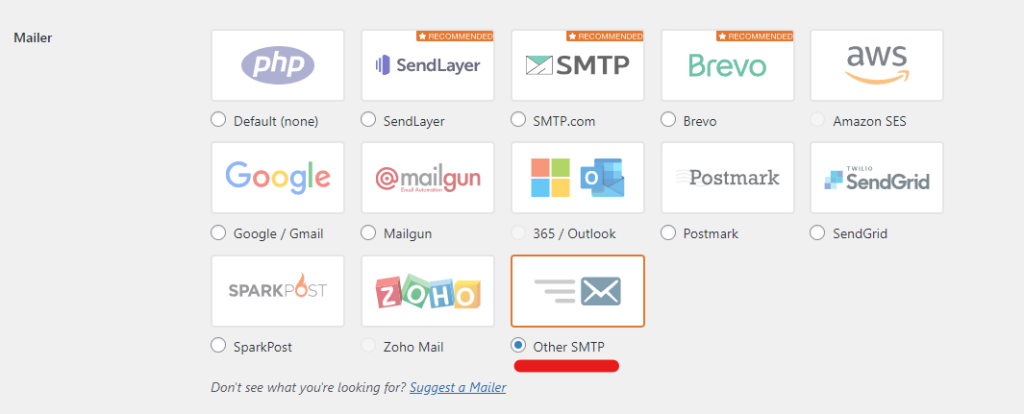
Sada biramo Other SMTP. (ne moze gmail, yahoo i slicni)
Podesavamo po uputstvu ispod:
- SMTP host je mail.vasdomen.ekstenzija znači menjate sa vašim domenom ali mora na početku da bude reč „mail“ pa tacka pa vaš domen pa tačka i ekstenzija. Ukoliko je vaš domen marko.rs onda ide mail.marko.rs. Reč „mail“ ne menjate sa vašom email adresom već je to reč kao na primeru ispod.
- SMTP port 587.
- Encryption TLS
- Authentication selektujte na ON
- SMTP username je vaša email adresa koju ste kreirali primer@vasdomen (ne moze gmail, yahoo…)
- SMTP password je password koji ste stavili prilikom kreiranje email adrese primer@vasdomen
- ne kucate webhostingsrbija.rs već vaše podatke
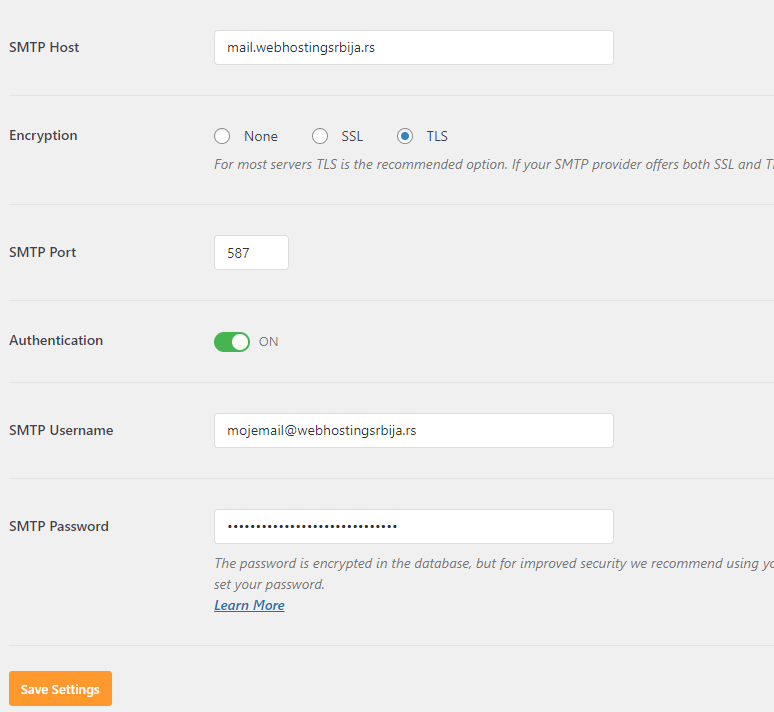
Kliknite na Save i to je to. Da li je ispravno imate Test opciju u Tools (ispod Settings).
Čestitamo uspešno ste podesili SMTP mail za vaš wordpress sajt.
Test ispravnosti:
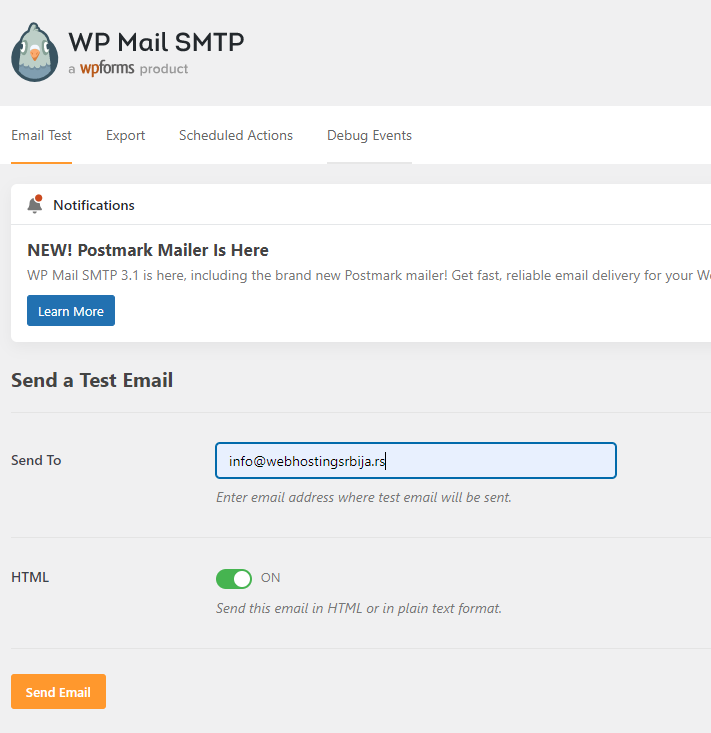
Idemo ponovo na WP mail SMTP ali ne idemo na settings vec na Tools
Kada kliknete na test dobicete polje za unos email adrese i kliknete na dugme Send Email kao na slici ispod:
Nakon toga ako piše neka greška znači da niste podesili kao iznad i vratite se na podešavanja i početak ovog podešavanja i podeiste ispravno.
Greka ako piše: Could not authenticate
To znači da vam je username (email) ili lozinka neispravna.
_DMARC podešavanje
Greška prilikom slanja emaila
Kada idete na test i dobijete da nije poslato znači da nešto nise ispravno uneli. Ispod je prikazano kako da vidite šta je problem.
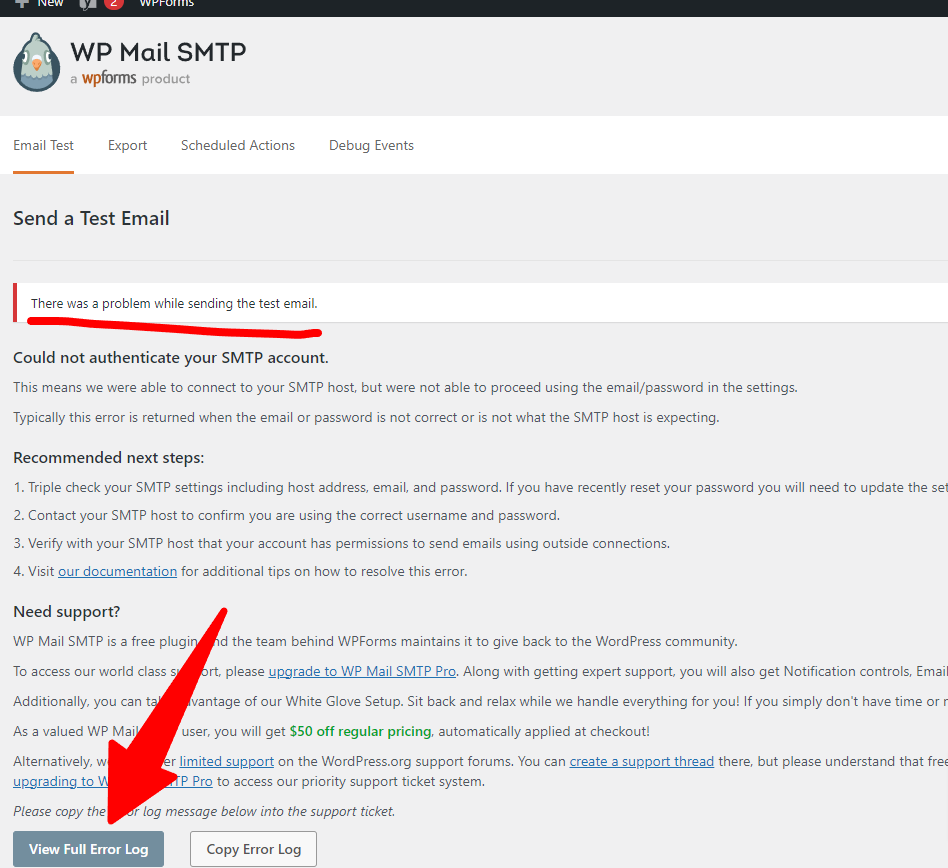
Kada idemo na dugme View Full Error Log prikazaće nam se kod kako radi mail i onda možemo da vidmo šta je problem.
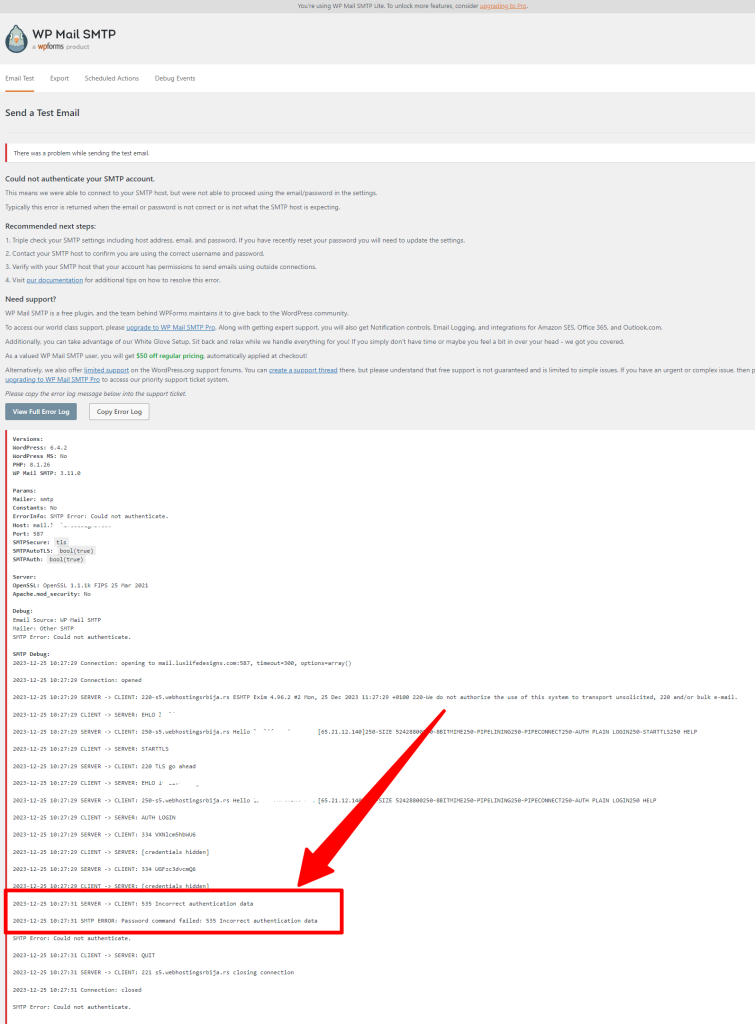
Kao što sa ove slike vidimo najčešći razlog Incorrect authentication data što znači da lozinka ili email adresa nisu ispravni.
Takođe može da se pojavi i greška među svim ovim linijama „Could not connect to host“ ili „Failed to connect to host“ to znači da SMTP server nije dobro podešen. Pa se vratite gore na podešavanja i postavite ispravno.
Druga opcija ukoliko ste 1000% podesili kao u ovom uputstvu znači da MX rekord i DNS nije ispravan na tom domenu i prvo je to ptorebno da se podesi.
Druga opcija koja je takođe moguća jeste da iskoristite PHP kod kako bi ste kreirali isto ovo.
Prvo što trebate da uradite kod ove opcije ukoliko nemate i niste aktivirali child temu to morate odmah da uradite. Kreiranje child teme imate na ovom sajtu kao uputstvo.
Nakon toga otvorite functions.php u child temi i iskopirajte sledeći kod:
add_action( "phpmailer_init", "wpse8170_phpmailer_init" );
 function wpse8170_phpmailer_init( PHPMailer $phpmailer ) {
 $phpmailer->Host = "mail.vasdomen.nesto";
 $phpmailer->Port = 587; // moze da bude drugaciji
 $phpmailer->Username = "primer@vasdomen.nesto"; // vasa email adresa
 $phpmailer->Password = "lozinka"; // password je obavezan
 $phpmailer->SMTPAuth = true; // obavezno
 $phpmailer->SMTPSecure = "true"; // ovo je obazno
 $phpmailer->IsSMTP();
 }
imajte na umu da možete pdoesiti i SSL za istu stvar port 465 i ssl. Sačuvajte izmene functions.php iz child teme i time ste završili.
Ukoliko ste ovo uradili u glavnoj temi functions.php nakon update teme ova izmena će nestati.
Gmail SMTP
Za podešavanje preko Gmaila potrebno je da koristite opciju gde kreirate posebnu lozinku za pristup. Uputstvo: https://support.google.com/accounts/answer/185833
Gmail SMTP preko app password opcije.
Prvo se ulogujemo na naš gmail nalog i pristupimo linku > https://myaccount.google.com/
Otvoriće nam se strana sa našim opcijama a mi idemo na Security
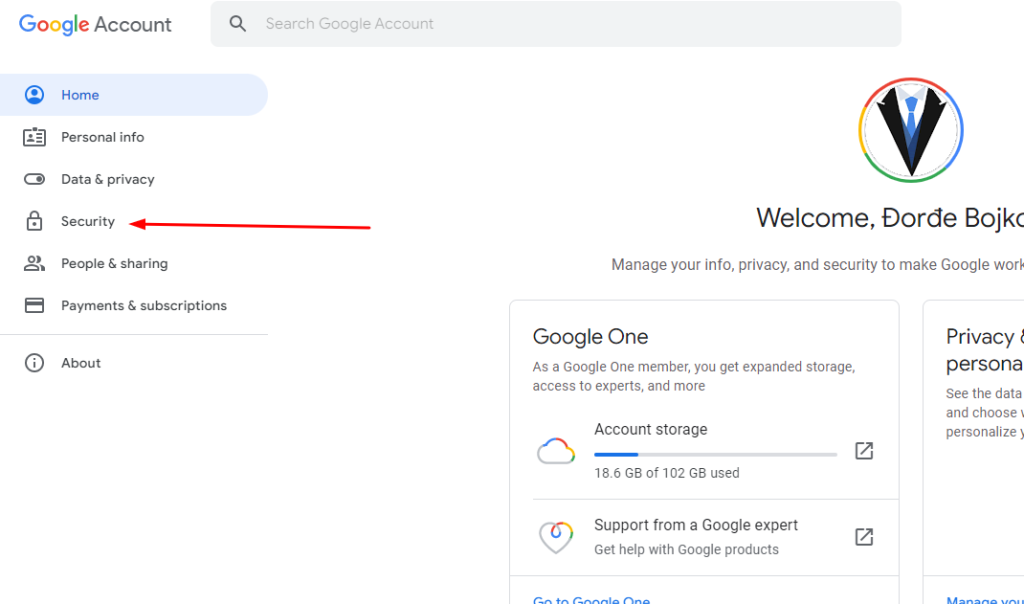
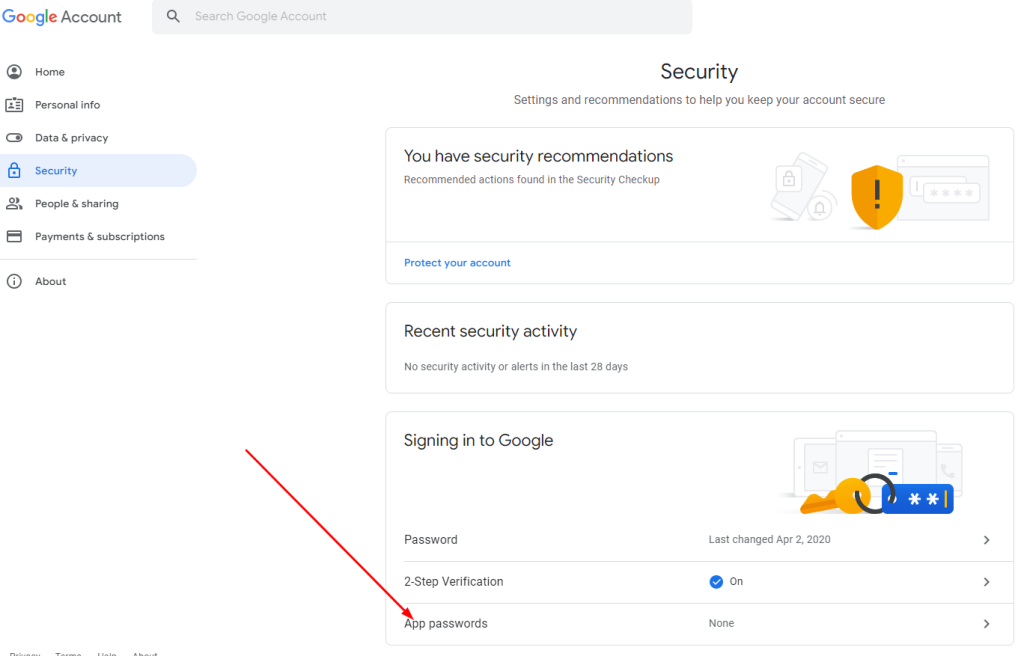
Sada kada smo kliknuli potrebno je da nađemo opciju App Password i kliknemo na to:
Sada kada smo kliknuli na to potrebno je da izaberemo za šta tačno kreiramo lozinku. Pošto nam je potrebn email iz prve padajućeg menija biramo Mail a iz drugog Other sobzirom da nam treba za sajt.
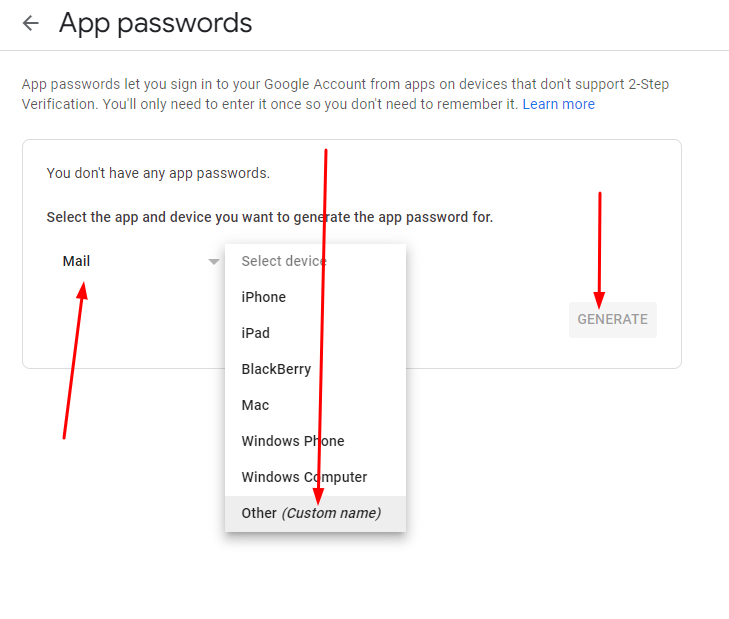
Sada kada smo to uradili i kliknuli na GENERATE dobili smo prozor kao na slici ispod
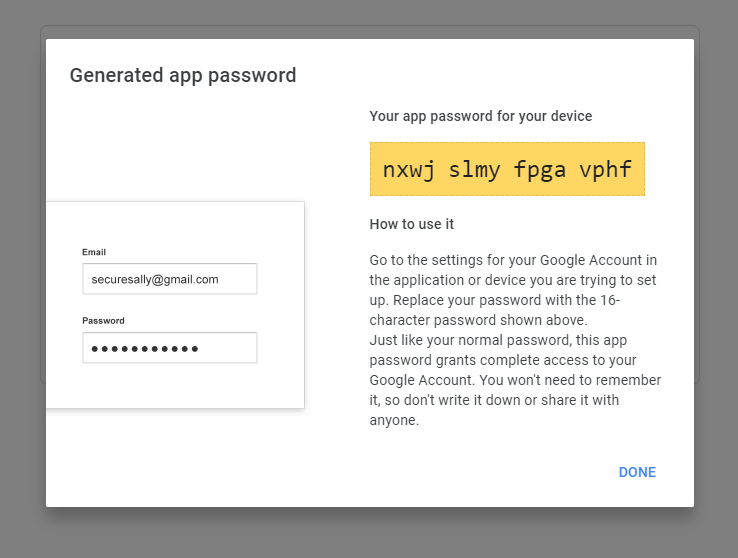
Ovi karakteri u narandžastom je lozinka naša i potrebno je da je sačuvate i podesite u SMTP settings
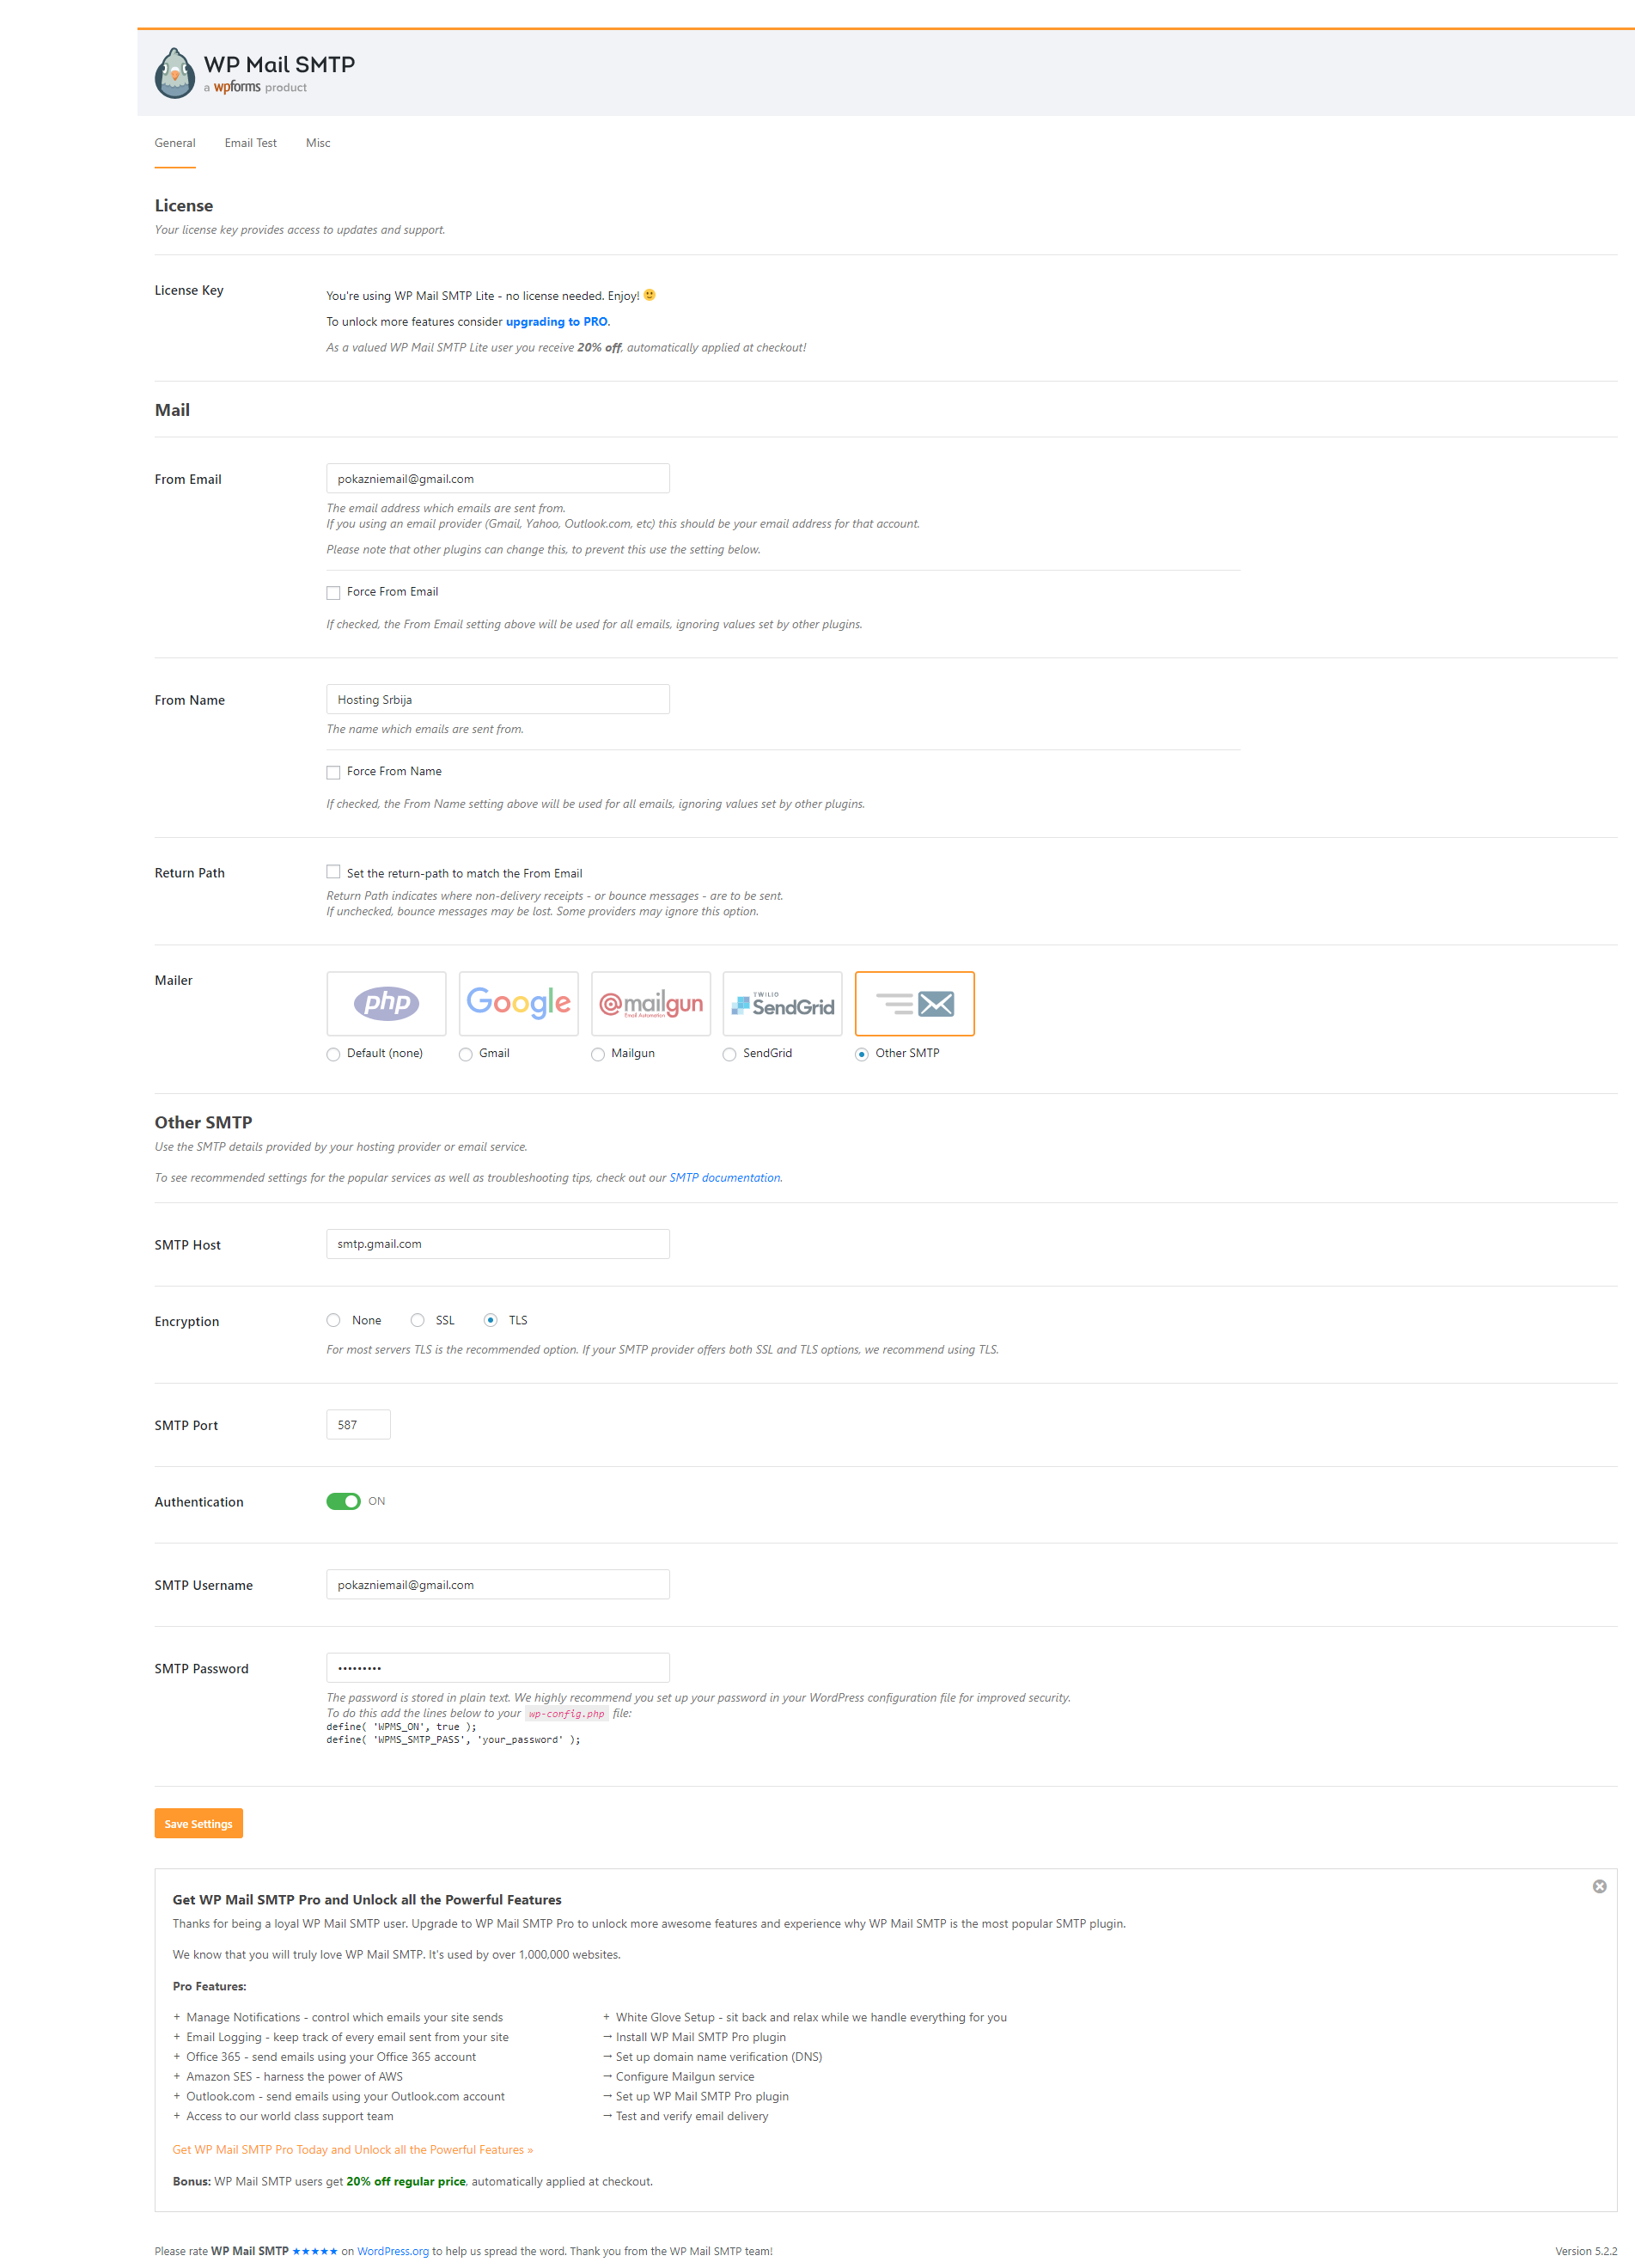
Host: smtp.gmail.com
Port: 587
Enkripcija: TLS
Username: Email adresa
Password: Lozinka iz narandzastog kvadrata
To je kompletno sve. Sada imate spreman email.
Less secure apps opcija više ne postoji.
Uputstvo ispod više ne može da se koristi od 30.5.2022 jer je google isključio tu opciju.
Potrebno je da odobrite GMAIL podešavanje
- Prvi korak odobrite da je moguće povezivanje van gmaila: https://myaccount.google.com/lesssecureapps
- Takodje možda treba da sklonite capcha ovo traje 10 minuta nekad kraće ili više zavisno šta radite: https://accounts.google.com/DisplayUnlockCaptcha
- Ukoliko koristite 2step verifikiaciju onda će vam ponuditi da kreirate posebnu lozinku za gmail koju koristite u pluginu (to je druga lozinka zapristup gmailu preko aplikacije tj plugina) https://support.google.com/accounts/answer/185833?hl=en
Za podešavanje gmaila koristićemo sledeće podatke:
Host: smtp.gmail.com
Port: 587
Enkripcija: TLS
Username: Email adresa
Password: Password od gmail-a.
Povezivanje putem plugina koji smo naveli gore:

Ono šta smo podesili je:
From email: vaša email gmail adresa
Mailer: Selektovali smo Other SMTP
SMTP host: smtp.gmail.com
Encryption: TLS
SMTP port: 587
Authentication: On
SMTP username: gmail email adresa
SMTP password: lozinka od gmaila
i kliknemo save settings.
Zatim se vratimo na vrh strane i biramo „email test“ unesemo email adresu i kliknemo send email. Ukoliko je sve u redu onda dobićete poruku da je poslato a email će biti sličan ovome:
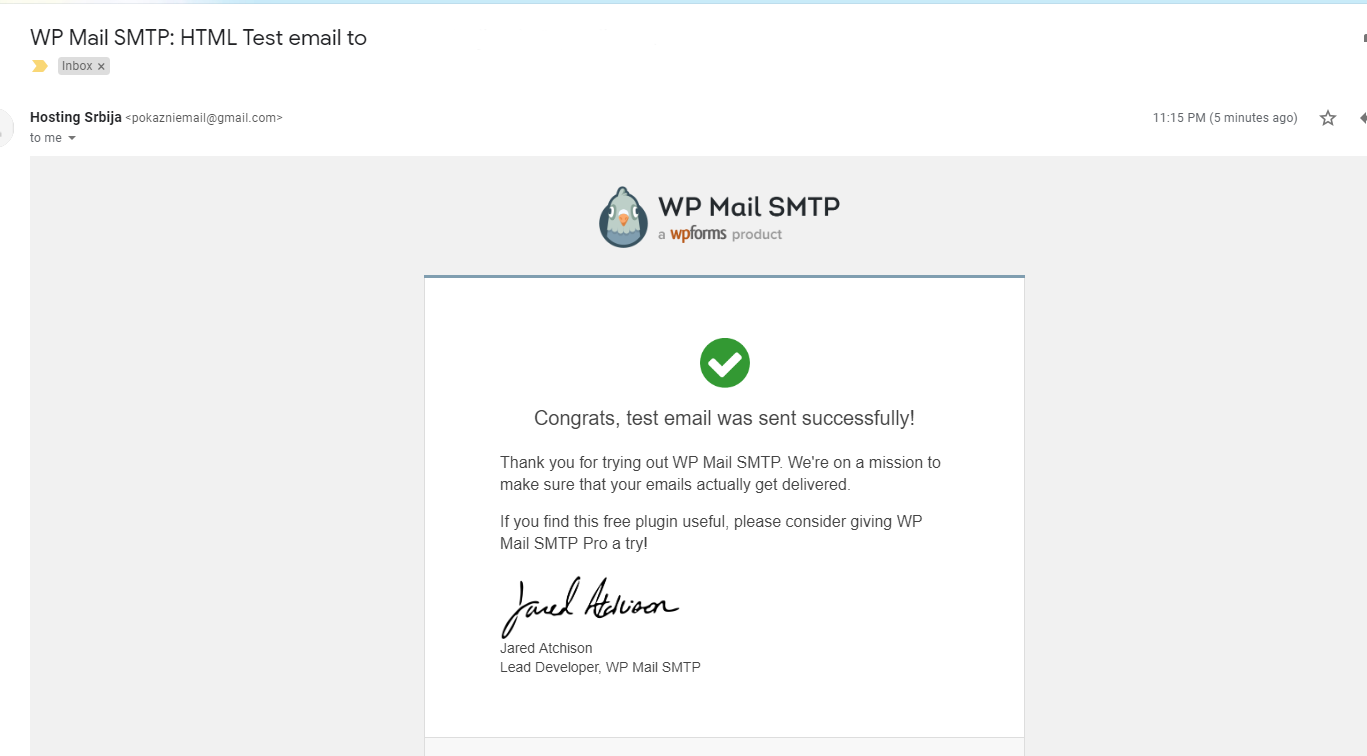
Time ste završili podešavanje.
Greška koja je moguća ukoliko vam se prilikom testa pojavi ova poruka:
There was a problem while sending the test email.
Onda i u inboxu svog gmail naloga dobićete sledeći email:
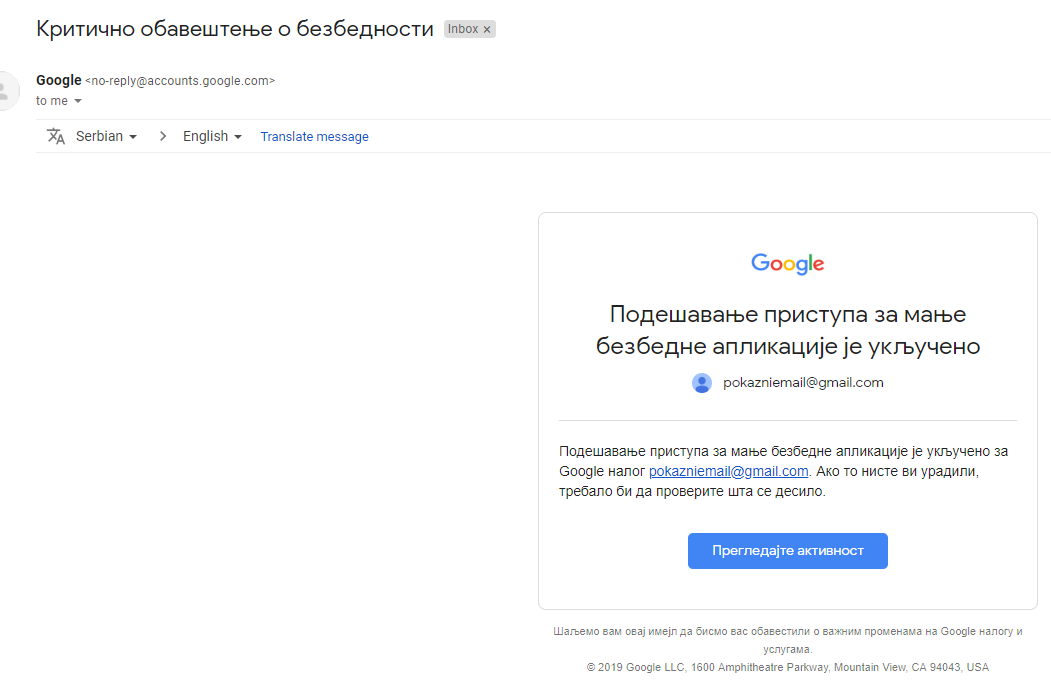
To znači da je uključena jedno podešavanje na vašem nalogu koje je potrebno da isključite.
Vaše podešavanje je na https://myaccount.google.com/u/0/security?hl=en-GB
Onda nađete gde piše

Potrebno je da kliknete na link „Turn on access“ i pojaviće vam se jedina opcija da je uključite kao na slici:
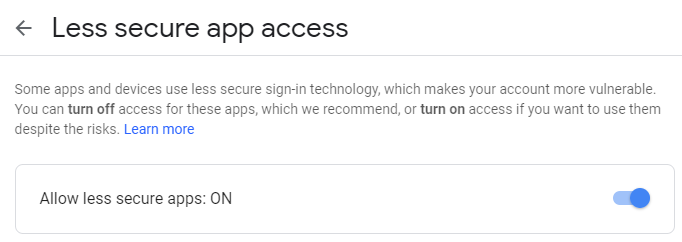
Ukoliko i dalje ne možete da pošaljete test email pogledajte log na toj istoj strani klikom na poslednju rečenicu koja je zapravo link:

Nakon toga otvoriće vam se kompletno šta se desilo u pozadini sa slanjem:
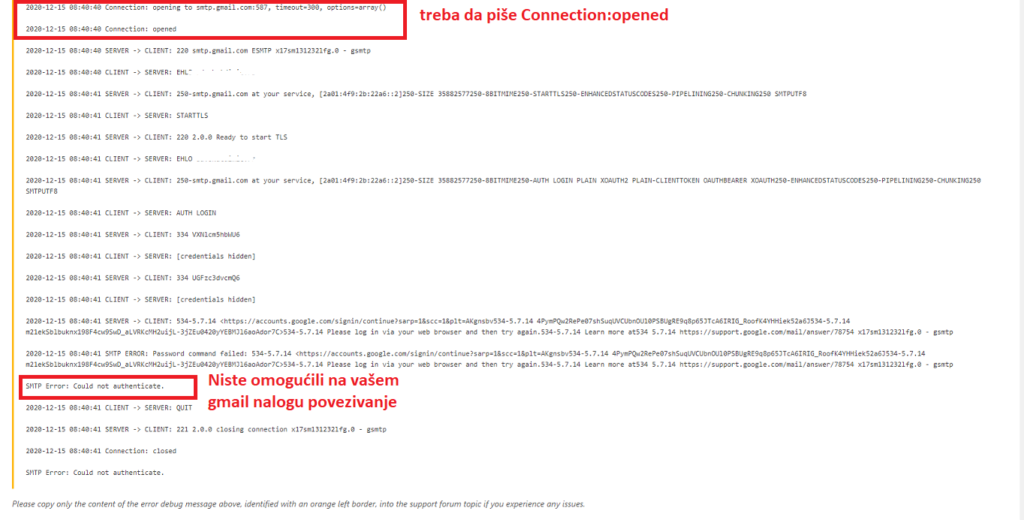
Kao što je označeno u prvom kvadratiću u tom tekstu negde treba da piše Connection: opened to znači da se plugin uspešno povezao na gmail.
U drugom kvadratu piše Could not authenticate što zapravo znači da niste odobrili na svom gmail nalogu sa početka ovog dela članka.
To je sve. Sada se vratite na test u wordpressu i time ćete omogućiti i primićete testni email i time je postupak završen.

